GPT摘要
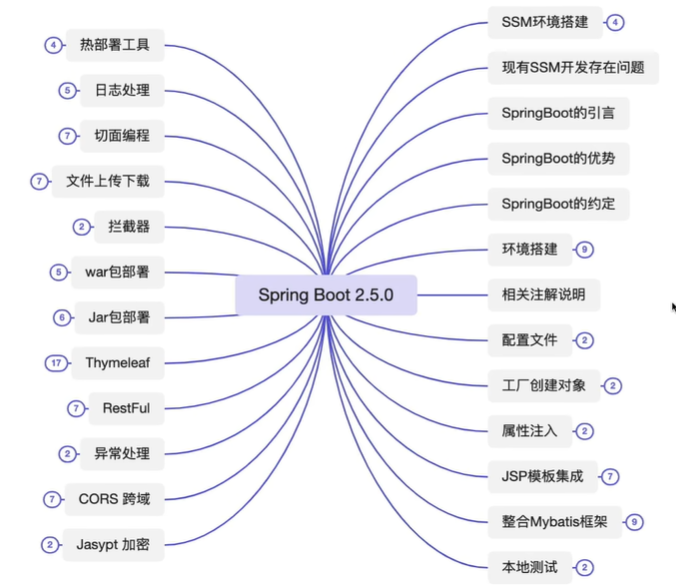
本文介绍了SpringBoot如何简化项目配置和开发流程,以及其核心特性和常用功能的实现方法。主要内容包括: SpringBoot相比传统Spring的优势:内嵌Tomcat、单一容器、自动配置、无需XML文件,通过约定简化Maven依赖管理。主要约定包括单一入口类(含main方法)和固定位置的配置文件(application.yml/properties)。 项目创建方式:可通过继承spring-boot-starter-parent父项目统一管理版本,或直接依赖spring-boot-starter-web。核心注解@SpringBootApplication组合了配置加载、自动配置和组件扫描功能。 配置管理:支持多环境配置(dev/test/prod),支持外部配置文件启动;通过@Value单个注入或@ConfigurationProperties批量注入属性;提供热部署插件devtools。 核心功能实现: 1. 对象管理:通过@Configuration+@Bean替代XML配置,沿用@Service等注解创建对象 2. Web开发:需引入tomcat-embed-jasper支持JSP,配置视图解析器 3. 数据访问:整合MyBatis只需配置数据源、Mapper路径和别名包 4. 事务管理:直接使用@Transactional注解 5. 单元测试:@SpringBootTest支持,注意JUnit版本差异 其他关键特性: - 日志系统:默认集成Logback,可分级配置 - AOP实现:通过@Aspect注解定义切面和通知 - 拦截器配置:实现WebMvcConfigurer接口 - 文件上传:配置Multipart属性限制大小 - 异常处理:@ControllerAdvice统一处理 - 跨域支持:@CrossOrigin注解或全局配置CorsFilter - 配置加密:使用jasypt保护敏感信息 - RESTful接口:通过HTTP方法区分CRUD操作 文中还包含具体配置示例和代码片段,展示了从基础配置到高级功能的全套解决方案。SpringBoot通过”约定优于配置”理念,显著降低了Spring应用的开发复杂度。
0.对比 模板化的大量配置文件,不需要tomcat运行。遵循约定,简化配置
springboot只是进一步的升级,简化项目搭建和开发。引入依赖,几行配置
springboot 微框架 = springmvc 控制器+ spring core项目管理
spring存在父容器spring.xml,子容器springmvc.xml。springboot只有一个
内嵌tomcat
简化maven,自动配置spring springmvc,没有xml
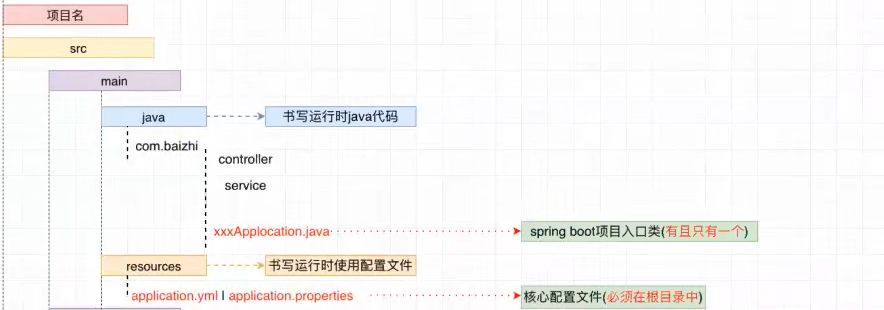
约定:
只有一个入口类 xxxxApplication.java,在所有子包目录之上; 需要main项目启动函数
配置文件:根目录resources中application.yml | application.properties
1.快速开始
创建spring项目,勾选springweb
or
创建maven项目
继承父项目 便于维护版本
<parent>
<groupId>org.springframework.boot</groupId>
<artifactId>spring-boot-starter-parent</artifactId>
<version>2.0.3.RELEASE</version>
</parent>
<dependency>
<groupId>org.springframework.boot</groupId>
<artifactId>spring-boot-starter-web</artifactId>
</dependency>
1 2 3 4 5 6 7 8 9 10 11 12 2. 配置文件变成小树叶3. ```javapublic class AdminApplication {public static void main (String[] args )class , args );
写一个@RestController
1 2 3 4 5 @SpringBootApplication
2.多配置文件 1 2 3 4 5 6 7 server: port: 8081 spring: profiles: active: dev
多环境情况:application为公共的
application.yml application-test.yml application-dev.yml application-prod.yml
此外,以外部生产配置文件启动(包含数据库隐私等)
java -jar –spring.config.location = filepath xxx.jar
3.创建对象 springboot 微框架 = springmvc 控制器
+ spring 管理项目对象
spring创建对象
< bean >
注解实现创建对象,需要扫描@Componet ,只是名称不同,为了更好的理解
@Controller
@Service
@Repository
Springboot :
@configuration 定义配置类 相当于xml。
里面@Bean ,用在方法上,返回值交给工厂。默认方法名是id(或者@bean(“beanid”))。 相当于< bean>
注解实现创建对象,启动时自动扫描了 指定名称: @Service(“helloImpl”) @Qualifier(value = “helloImpl”)
@Controller
@Service
@Repository
4.属性注入 和spring一样,但都通过注解实现。包含引用类型和基本类型
@Value(“${user.name}”) @Value(“xiaoming”) 单个注入
数组也可以直接注入,yml逗号隔开
maps: “{‘aa’:’你好’}” #{${maps}}
批量注入,用在类上, @ConfigurationProperties(“spring.datasource”)
自动找spring.datasource里面的属性,按名称注入到类的属性中,需要提供set方法
@Autowired
5.JSP集成 引入依赖 tomcat-embed-jasper ,解析jsp
java同级的webapp文件夹
原来springmvc有视图解析器,现在是设置配置文件
1 2 3 4 5 spring: mvc: view: prefix: / suffix: .jsp
通过插件启动,以防idea找不到jsp
6.整合Mybatis 0.引入依赖
spring-boot-starter-web
mysql驱动 druid数据源
mybatis-spring-boot-starter
1 2 3 4 5 6 7 8 9 10 11 12 13 14 15 16 17 <dependency > <groupId > mysql</groupId > <artifactId > mysql-connector-java</artifactId > <scope > runtime</scope > </dependency > <dependency > <groupId > com.alibaba</groupId > <artifactId > druid</artifactId > <version > 1.1.21</version > </dependency > <dependency > <groupId > org.mybatis.spring.boot</groupId > <artifactId > mybatis-spring-boot-starter</artifactId > <version > 2.1.4</version > </dependency >
1.配置数据源
1 2 3 4 5 6 7 8 9 10 11 12 13 14 15 16 spring: datasource: type: com.alibaba.druid.pool.DruidDataSource driver-class-name: com.mysql.cj.jdbc.Driver com.mysql.jdbc.Driver url: jdbc:mysql://127.0.0.1:3306/challenge2?serverTimezon=UTC&userUnicode=true&characterEncoding=utf-8 username: root password: 123456 等价 <!--使用spring数据源--> <bean id="dataSource" class="org.springframework.jdbc.datasource.DriverManagerDataSource"> <property name="driverClassName" value="com.mysql.jdbc.Driver"></property> <property name="url" value="jdbc:mysql://localhost:3306/mybatis?useSSL=true&useUnicode=true&characterEncoding=utf8"></property> <property name="username" value="root"></property> <property name="password" value="123456"></property> </bean>
2.创建Factory,指定mapper文件的位置
1 2 3 4 5 6 7 8 9 10 11 12 13 14 15 mybatis: type-aliases-package: com.dhu.yarn.entity mapper-locations: classpath:com.dhu.yarn/mapper/*.xml configuration: map-underscore-to-camel-case: true 等价 <bean id="sqlSessionFactory" class="org.mybatis.spring.SqlSessionFactoryBean"> <!--数据源--> <property name="dataSource" ref="dataSource"></property> <!--mapper--> <property name="mapperLocations" value="classpath:com/kuang/mapper/*.xml"></property> <!--绑定mybatis配置文件--> <property name="configLocation" value="classpath:mybatis-config.xml"/> (可以不要) </bean>
3.@MapperScan(“com.xun.dao”) 扫描Dao接口所在的包,同时创建bean 。可能爆红但不影响
or @Mapper一个一个创建添加,让mybatis找到,表示他是用来访问数据库的 ,对应Mapper接口。同时可以创建bean
@Repository只可以创建普通bean,所以只起标识作用。单独使用bean of type BookMapper that could not be found.
等价
1 2 3 4 <bean class ="org.mybatis.spring.mapper.MapperScannerConfigurer" > <property name ="basePackage" value ="org.mybatis.spring.sample.mapper" /> <property name ="sqlSessionFactoryBeanName" value ="sqlSessionFactory" /> </bean >
不用配置开启事务,直接在serviceImpl上@Transactional
7.测试 1 2 3 4 5 6 7 8 9 @SpringBootTest class Springboot2ApplicationTests {@Test void contextLoads () {import org.junit.jupiter.api.Test 用在Spring Boot 2.2 .X以后 JUnit 5 import org.junit.Test用在2.2 .x之前 添加 @RunWith(SpringRunner.class) 否则注释将被忽略
@Autowired service 层 ,调试单个service函数很快
8.热部署 1 2 3 4 5 6 7 8 9 10 11 12 <dependency > <groupId > org.springframework.boot</groupId > <artifactId > spring-boot-devtools</artifactId > <optional > true</optional > </dependency >
9.日志 默认集成logback,和log4j作用一样
日志级别:
rootLogger默认
1 2 3 4 5 logging: level: root: info com.baizhi.mapper: debug
1 2 3 4 5 6 7 8 private static Logger logger = LoggerFactory.getLogger(当前类.class);"12312" ) # 代替sout"端口冲突,异常信息:{} {}" , "第一个参数" , "第二个参数" );@Slf4j "测试log-------------------------" );
10.小项目 密码要md5(不可逆)加密保存,登录时将将密码转换后进行对比。传统项目成功后存入session中
1 String newpassword = DigestUtils.md5DigestAsHex(password.getBytes(StandardCharsets.UTF_8))
出现业务错误时,抛出异常
controller除了返回到页面,还包含跳转到别的controlle,注意使用forward还是redirect。
如添加完成员工接口后redirect到查询接口,查询完成后forward到显示界面
11.AOP spring
1 2 3 4 5 6 附加操作 继承接口public class Log implements MethodBeforeAdvice {public void before (Method method, Object[] objects, Object o) throws Throwable {"执行了" +method.getName()+"方法" );
1 2 3 4 5 6 7 配置bean;配置切入点,组装切面<bean id ="logbefore" class ="aop.Log" > </bean > <aop:config > <aop:pointcut id ="pointcut" expression ="execution(* com.kuang.service.UserserviceImpl.*(..))" > </aop:pointcut > <aop:advisor advice-ref ="logbefore" pointcut-ref ="pointcut" > </aop:advisor > </aop:config >
springboot
无xml文件
引入依赖
1 2 3 4 5 <dependency > <groupId > org.springframework.boot</groupId > <artifactId > spring-boot-starter-aop</artifactId > </dependency >
编写切面类
1 2 3 4 5 6 7 8 9 10 11 12 13 14 15 16 17 18 19 20 21 22 23 24 25 @Configuration @Aspect public class MyAspectConfig {@within("execution(com.xun.springboot2.controller.*)") @Pointcut("execution(* com.xun.springboot2.controller.*.*(..))") public void controllerLog () {@Before("controllerLog()") @After 还可以针对注解生效public void before () {"before" );@Around("controllerLog()") public Object around (ProceedingJoinPoint proceedingJoinPoint) throws Throwable {"around start" );Object proceed = proceedingJoinPoint.proceed(); "around end" );return proceed;
12.拦截器 spring :编写类,return true放行。然后注入bean并且配置拦截哪些请求
1 2 3 4 5 6 7 8 <mvc:interceptors > <mvc:interceptor > <mvc:mapping path ="/**" /> <bean class ="com.kuang.config.JWTInterceptor" > </bean > 或者分开 <ref bean = "beanname" > </mvc:interceptors >
springboot
编写类,return true放行。// 多个拦截器是栈结构,pre1 pre2 do post2 post1
编写配置类,implements WebMvcConfigurer (原来写在springmvc.xml里,现在实现WebMvcConfigurer,WebMvcConfigurer里面包含很多mvc的配置方法,如addResourceHandlers)
1 2 3 4 5 6 7 8 9 10 11 12 @Configuration public class InterceptorConfig implements WebMvcConfigurer {public void addInterceptors (InterceptorRegistry registry) {new JWTInterceptor ())"/**" )"/user/**" )"/image/**" )1 )
13.文件上传下载 上传到服务器本地、阿里云oss
打包成jar时,不能上传到项目内部的某个文件夹,因此直接上传到机器一个固定目录(配置文件注入)
本地和生产不同,使用多个配置文件
1 2 3 4 5 6 7 8 9 发送 multipart/form-data 接受 MultipartFile f servlet: multipart: max-file-size: 300MB max-request-size: 500MB enabled: true
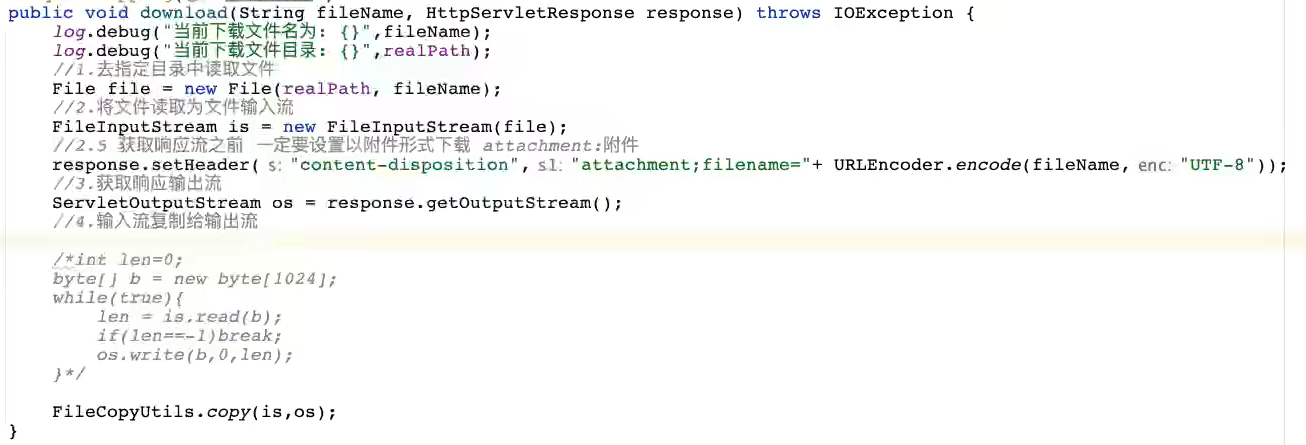
下载
14.异常处理 传统的:继承HandlerExceptionResolver,不同异常不同if处理
springboot:
1 2 3 4 5 6 7 8 9 @ControllerAdvice public class GlobalException {@ExceptionHandler(BusinessException.class) @ResponseBody public Result handleBusinessException (HttpServletRequest request, BusinessException ex) {this .getClass()+"业务异常:" +ex.getMessage()+" 代码:" +ex.getCode());return Result.error(ex.getCode(), ex.getMessage());
15.CORS 跨域资源共享
源:协议 域名 端口。默认情况下,不同源不能互相访问。ajax
controller类上@CrossOrigin 允许跨域访问
全局配置:
1 2 3 4 5 6 7 8 9 10 11 12 13 14 15 16 17 18 19 20 21 22 23 @Configuration public class CorsConfig {private CorsConfiguration buildConfig () {CorsConfiguration corsConfiguration = new CorsConfiguration ();"*" );"*" );"*" );600L );true );return corsConfiguration;@Bean public CorsFilter corsFilter () {UrlBasedCorsConfigurationSource source = new UrlBasedCorsConfigurationSource ();"/**" , buildConfig());return new CorsFilter (source);
16.加密 jasypt对密码进行加密。提供一个类进行加密和解密,需要配置密钥,没有密钥解密会失败。在运行时传参输入密钥
使用:ENC(加密后字符串)
17.传参 参考sping里springmvc传参
18.restful 用访问方法指明操作,put要id和User,先查再改
1 2 3 4 5 6 7 8 9 10 11 12 13 14 15 16 17 18 19 20 21 22 23 24 25 26 27 @RestController @RequestMapping("/api/users") public class UserController {@Autowired private UserRepository userRepository;@GetMapping("/") public List<User> getAllUsers () {@GetMapping("/{id}") public ResponseEntity<User> getUserById (@PathVariable(value = "id") Long userId) {@PostMapping("/") public User createUser (@RequestBody User user) {@PutMapping("/{id}") public ResponseEntity<User> updateUser (@PathVariable(value = "id") Long userId, @RequestBody User userDetails) {@DeleteMapping("/{id}") public Map<String, Boolean> deleteUser (@PathVariable(value = "id") Long userId) {